Thank you for using Buddyblog Pay Per Post Plugin. This page will help how you configure a WooCommerce Product to be used with the BuddyBlog Pay Per Post plugin.
BuddyBlog Pay Per Post plugin needs a simple virtual product with a price which can be associated with BuddyBlog Pro forms.
Here is a screenshot showing an example settings.
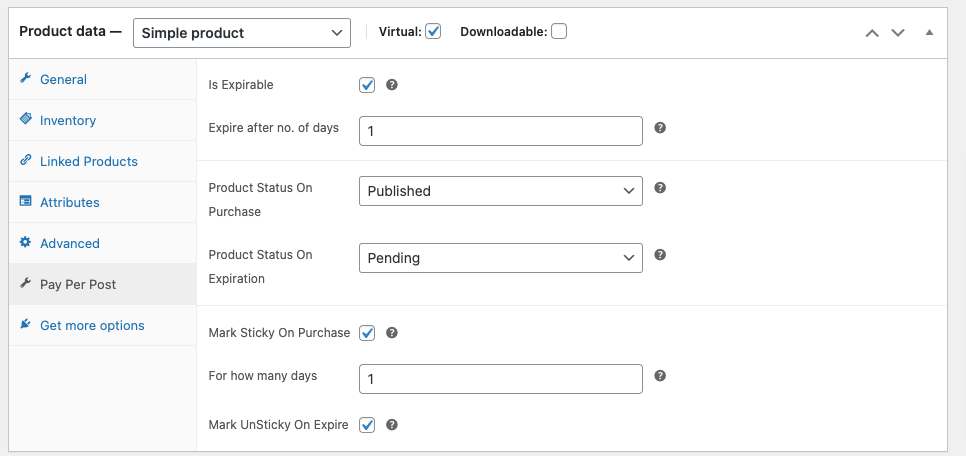
WooCommerce Product Settings
Steps to configure:-
- Please select the product type to be “Simple Product” and mark it as virtual as shown above.
- Click on the ‘Pay Per Post’ tab. It will display only if you have selected the virtual option. If it is not visible. Please save the product after marking it as visrtual and reload the edit page, that will make it visible.
- Under the Pay Per Post tab, all settings for the Pay Per Post plugin are available as shown above.
Settings:-
- Is Expirable:- You can mark a product as expirable. If you enable it, you can set when the post will expire and what happens on post expiration. If you don’t enable it, the post won’t expire.
- Expire After No. Of Days: – If the post expiration is enabled, you can can use it to configure the expiration time in number of days. Leave this option blank if you won’t want any limit.
- Product Status On Purchase:- This is the post status which will be set on a successful purchase .
- Product Status On Expiration: This is the post status that will be set on expire.
- Mark Sticky On Purchase:- Use it to mark a post as sticky on successful purchase.
- For How Many Days:- If you enable sticky option, you can use it to configure for how many days the post will remain sticky?
- Mark UnSticky On Expire:- If enabled, sticky posts will become normal posts.