BuddyPress Member Types pro comes with two custom xprofile fields.
- Single Member Type field:- Allows to assign only one member type to a user.
- Multi Member Type field:- Allows to assign one or more member types to a user.
Creating Member Type profile Field:-
Step 1:- Please visit Dashboard->Users->Profile fields ash shown below
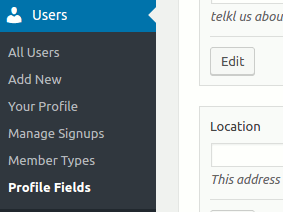
If you are on multisite, You can access it from Network admin->Users menu.
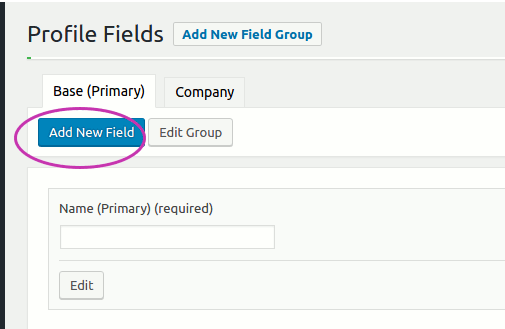
Step 2:- Select the profile field group and click on Add New field as shown below:-
Step 3:– Selecting a member type field.
Once you have clicked on the Add New Field, you will see a screen like this
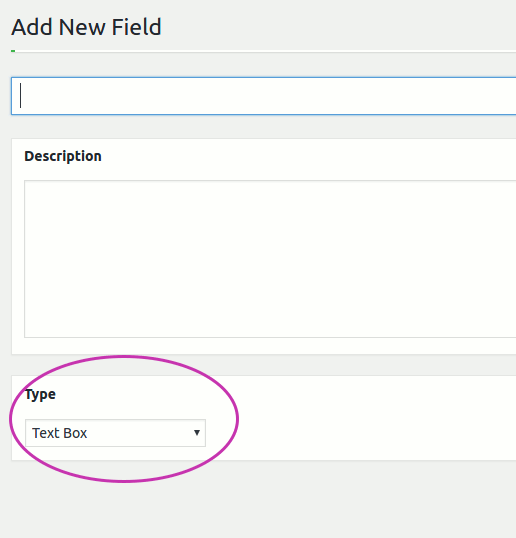
Note the Type select Box. This select box allows you to choose the profile field type.
If you click in this select box, you will see a list of field types like below(Your field type may vary slightly)

As shown above, You will note two member type fields:- Multi Member Type and Single Member Type.
Recommendation:-
The goal of member type is to mostly allow you classify users.
- Use single member type when you know that your users will fall only one category. For example if you have member types say “teacher”, “student”, you know that these are mutually exclusive. a person can be either a teacher or student. Single member type is best suited for this. A rule of thumb should be if the member types are mutually exclusive, single member type should be used.
- Use multiple member type field when a user may fall into more than one category. It is best suited for the scenarios like sports sites(fan of multiple club), intranet(staff as well as some other role) and any other scenario where you want to have your users more than one category.
- There is no restrictions on which field types you select, the above recommendation is just a suggestion.
Creating a Single Member Type field:-
To create single member type field, please select the “Single Member Type” from the field type dropdown. As soon as you select the field type, you will see the following options:-
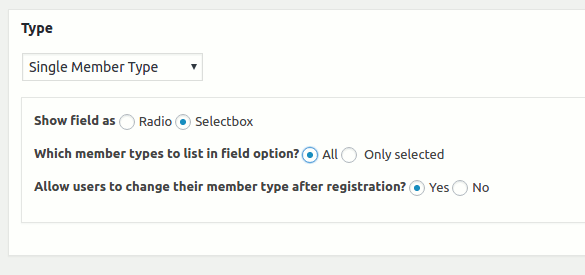
As you see there are three options:-
1. Show field as:- It controls how the field will be displayed on the registration and the edit profile pages. You can select the field to be shown as a drodown list of member types or a radio list of member types as shown below.
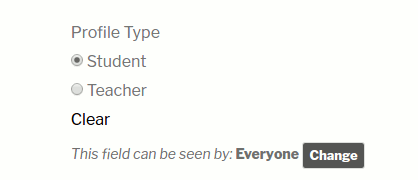
Radio:-
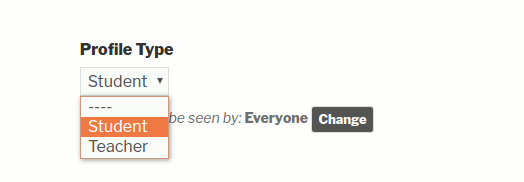
Selectbox:-
2. Which member types to list in the field options:– It allows you to limit the member types that will be shown in the profile field options. If you select “All”, all registered(and active) member types will be listed.
If you select “Only Selected” you can select the list of allowed member types as shown below.

3. Allow users to change their member types after registration:– This option allows you to restrict users from changing ther member type once it is set. It is useful when you do not want to allow your users to change their member type once they have selected it.
Click “Save” and your member type field is ready.
Creating Multi Member Type field:-
To create multi member type field, please select the multi member type from the field list. When you select the multi member type field, a list of options will appear as shown below.
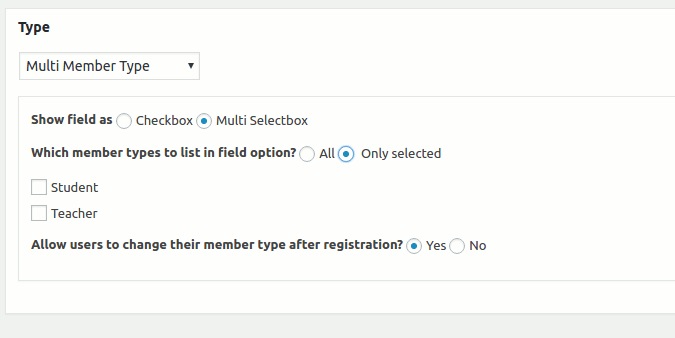
You will see three options there:-
1. Show field as:- It controls how the field will be displayed on the registration and the edit profile pages. You can select the field to be shown as a multi select drop down list of member types or a list of checkboxes of member types as shown below.
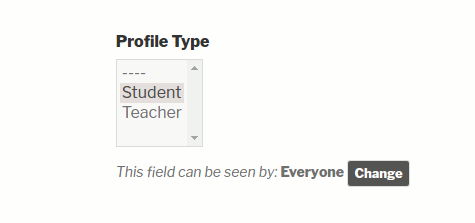
Multi Select:-
Checkbox:-

2. Which member types to list in the field options:– It allows you to limit the member types that will be shown in the profile field options. If you select “All”, all registered(and active) member types will be listed.
If you select “Only Selected” you can select the list of allowed member types which will be available to the users as profile field options.
3. Allow users to change their member types after registration:– This option allows you to restrict users from changing their member type once it is set. It is useful when you do not want to allow your users to change their member type once they have selected it.
Click “Save” and Your member type field is ready.
Note:-
We recommend creating only one Member type field. It allows us to easily synchronize the profile field type and the member type. The synchronizing behaviour for a site with multiple member type field is not well defined.